Your shopping cart is empty!
0 0 item(s) - $0.00
Nest Checks
Doing weekly nest checks—lowering your Purple Martin housing, looking inside all the cavities and recording what you find—is one of the best ways to know what’s going on at your martin colony. You can detect and correct any problems that may develop throughout the season and will increase your knowledge and enjoyment of your martins. Nest checks will not cause the martins to abandon the colony site, they will become used to the routine. The PMCA offers nest check sheets here; Nest Check Form
When: You can start conducting nest checks once the martins have begun bringing in nesting material. Once they bring in green leaves to line the nest, egg-laying soon follows.
You can lower down the housing midday or during the afternoon. Avoid lowering during the early morning, evening and bad weather. Avoid the hottest and coolest time of day when eggs may need incubated or nestlings might require brooding.
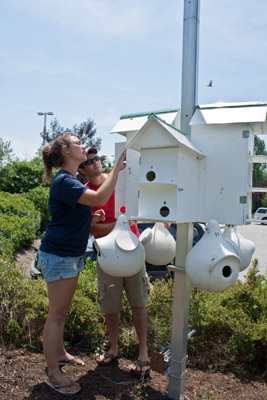
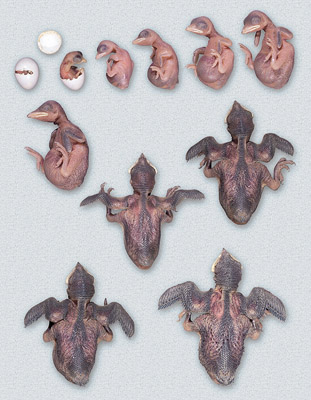
How: Lower housing and check each cavity. Record the stage of nest building, number of eggs and/or hatched young. Age nestlings using the PMCA’s Prognosticator and Laminated Martin Photos—this is especially important if you don’t know the date the first egg was laid. Make sure you don’t miss any eggs hiding under nesting material. Aim to have each system down for no longer than 20 minutes. With larger systems you may have to spread a check out over the day (late morning and mid-afternoon) or two days.
 |
 |
How Often: Checks every 4 or 5 days during egg laying will help you accurately record first egg dates and calculate projected hatching and fledging dates. Once egg laying is completed checking nests every 5-7 days is sufficient. Avoid long gaps of 10-14 days between checks. Continue nest checks until all young have fledged.
To avoid premature fledging (nestlings leaving the nest before they can properly fly) keep checks on nestlings 22 days or older very brief. Just look inside to confirm that nestlings are present. Use the plug & string method to keep older nestlings safely inside throughout the nest check. Tie a string, long enough to reach the ground with the system raised. Quietly lower the system and plug the cavities containing nestlings 22 days and older. Once you have completed the nest check, raise the system, and wait 5-10 minutes for the nestlings to settle down. Gently tug on the strings to remove the plugs.
Once the system is raised, walk all around the housing. Make sure all the doors are closed and caps on the gourds and all the plugs are removed from the cavities.
When to Check: Do an extra check when—
A nestling is on the ground. Return it to the correct nest or place with similar sized young if you’re not sure what nest it is from.
Bad weather has ended. Check for wet nests, dead birds.
You see signs of predation or other problems below housing, such as martin feathers or owl feathers.
You notice a change in the martins’ behavior—they seem agitated, won’t land or enter cavities, etc.
Avoid Checking;
When the birds are weather-stressed, UNLESS you notice a problem, such as a dead bird blocking an entrance.
In the evening or after dark—if there is a problem with the cable or pole, there won’t be time to fix it.
When weather is bad & parents are busy feeding nestlings.
Nest Check Tools
*Notebook, pencil, clipboard
*Prognosticator and Laminated Martin Photos
*Mirror on an extendable handle-great for checking higher cavities and dark compartments
*Project MartinWatch forms
*Small flashlight
*Plugs with long strings attached—for checks on older nestlings
*Wet wipes and/or antibacterial hand cleaner
*Extra nesting material
*Latex gloves and dust mask-for windy days
What to Do When You Find Parasites
Parasites—including lice, fleas, mites, and blowfly larvae—are a normal part of Purple Martin life. The martins themselves bring many of the parasites into the nest. By the time the nestlings mature, the nest can be overrun with parasites. At this point, nest replacements can help reduce stresses on the resident martins. Conducting nest replacements, replacing the old parasite-infested nest with fresh nesting material, helps to remove the majority of parasites in the nest and is safe for both the parents and nestlings.
Replace the old nesting material once the nestlings are 9-10 days old (when their feathers are starting to show). Replace one nest at a time, to ensure that all nestlings are returned to their proper cavity. Place the nestlings in a tall bucket with a layer of bedding and a cover. Remove the old nesting material and wipe the inside and outside of the cavity with a damp cloth. Add fresh nesting material and replace the nestlings. Do not spray the housing with insecticide or cleaning products.
The PMCA does not recommend the use of any pesticides in the nest. Sevin, which is an insecticide used on adult poultry, has not been tested for use with wild birds or altricial nestlings (birds which hatch without feathers). Diatomaceous Earth (DE) is also not recommended for use in martin nests. DE can be an inhalation hazard for martins and has been linked to silicosis and other lung diseases in animals. Nestlings are often exercising their wings (flapping) prior to fledging, which can stir up the dust particles from the DE and may be inhaled by the nestlings. Nest replacements are the recommended method for controlling parasites.
Recommended Reading:
How & Why to Conduct Nest Checks
Nest Check Guide